Pages

Saturday, February 24, 2024

Mojito Dragon


Supplies
Tube of choice - Stanley Morrison August 2020 bonus tube. This tube is from CDO but is not currently available for sale.  Please do not use this tube if you don't have a license for it.
Font of choice - Mousemoon
Word art of choice - Click below to open mine up and right click to save if you would like to use it.


Filters
Mura's Meister Copies
Xero Fritillary
AAA Frames Foto Frame
Eye Candy 4000 Gradient Glow (optional)

1. Open a new image 600 x 400.
2. Copy and paste your tube as a new layer.
3. Apply Mura's Meister Copies Wallpaper Rotate Default settings
4. Adjust Blur Gaussian Blur Radius 15.
5. Apply Xero Fritillary with the following settings.
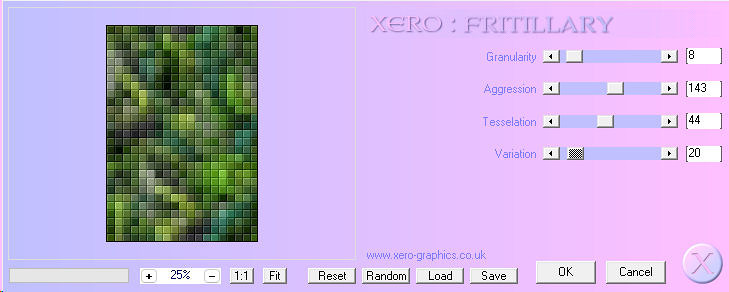
mojitodragon1
6. Paste your tube again as a new layer.  Resize as necessary and move into position.
7. Duplicate twice and close out the top two layers for now.
8. On your original layer, apply Distortion Effects Wind with the following settings.
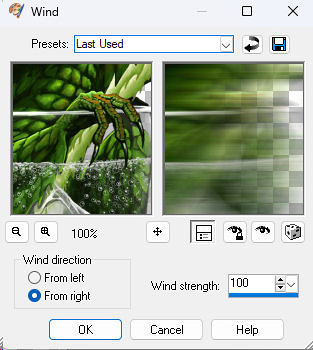
mojitodragon2
9. Repeat step 8 but change the direction of the wind to the left.
10. Unhide your middle tube layer and Adjust Blur Radial Blur with the following settings.
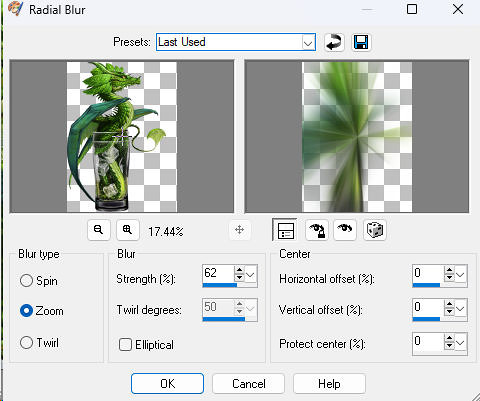
mojitodragon3
11. Mirror this layer and change the blend mode to suit your tag.  I changed mine to Screen.
12. Unhide your top tube layer and apply a drop shadow of choice.
13. Crop your tag to Merged Opaque (600 x 400).
14. Merge visible.
15. Apply AAA Frames Foto Frame with the following settings.
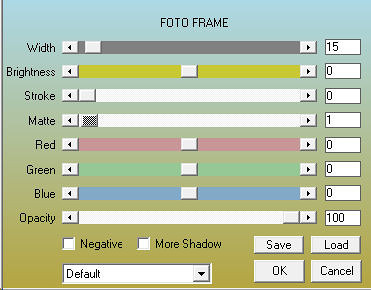
mojitodragon4
16. Apply word art of choice.  If you use my word art, I resized it by 50% and added a gradient glow to make it pop.
17. Add a drop shadow of choice to your word art.
18. Add your copyrights and name and save as a PNG or JPEG.


Sunday, February 18, 2024

Puzzled


Supplies
Tube of Choice - I'm using one by Carolina Seabra which can be purchased here.
Image or photo of choice - If the tube comes with an image, that works best, but a stock photo can be used, as well.  I'm using a photo from NASA here.
Mask of Choice - I used RD Mask 835 here.
Word Art of Choice - I used word art from the Escape from Reality blog here.

Filters
Alien Skin Xenofex 2 - Puzzle
Mura's Meister Copies
Eye Candy 4000 Gradient Glow (Optional)

1. Open your image in PSP. Shift+D to duplicate and close the original.
2. Image Resize so that the longest side is about 450 pixels.
3. Promote background to layer and duplicate this layer.
4. Hide your bottom layer and activate your top layer.
5. On your top layer apply Xenofex Puzzle with the following settings.  Make sure to click knock out 10% remaining.


6. With your magic wand, click inside each of the blank spaces and expand by 1.
7. Unhide your bottom layer and make it active.
8. Invert your selection and hit delete on your keyboard. Select none.
9. Set your image to the side for a moment and open a new transparent image 800x800.
10. Copy and paste the top layer of your image as a new layer.
11. Image rotate 30 degrees to the left. Move up and to the left.
12. Add a drop shadow of choice.
13. Copy and paste the bottom layer or your image as a new layer and position where you think it looks best.
14. Add a drop shadow of choice.
15. Copy and paste your tube as a new layer.
16. Put into position on the right side of your image and add a drop shadow of choice.
17. Paste your tube as a new layer again and apply Mura's Meister Copies Wallpaper Rotate with default settings.  If your entire canvas isn't covered, apply it again.
18. In your layer palette, drag this layer to the bottom.
19. Adjust Blur Motion Blur - Degrees 40 Strength 100.
20. Apply Mask of choice.
21. Add word art as a new layer and move it into place.  I colorized mine to match my tag.
22. Add a Gradient Glow of choice to your word art to make it pop and drop shadow.
23. Crop your image and resize to your preferences.
24. Add your credits and name.


Saturday, February 17, 2024

Amber Ripple


Supplies

Tube of choice - I used a tube by Amber, which can be purchased here.

Mask of choice - Sorry, I don't remember which mask I used.

 Filters

Mura's Meister Copies

1.  Open a new canvas 800 X 800.
2.  Copy and paste your tube as a new layer. Resize. Duplicate 3 times.  Hide the top 3 layers.
3. On the bottom layer apply Mura's Meister Copies Wallpaper Rotate with default settings.  If the canvas isn't completely covered, repeat.
4.  Adjust Blur Radial Blur with the following settings.

5. Unhide the second tube from the bottom
6. Distortion effects Twirl 720 degrees. Repeat.  Drop Shadow.
7. Unhide the second tube from the top.
8. Distortion effects Ripple with the following settings. Depending on your tube, you may need to resize this layer. Drop shadow. 


9. Duplicate Mirror/Flip.  Drag duplicate ripple layer under the twirl layer.
10. Unhide your top tube layer. Drop shadow.  Drag under your top ripple layer.
11.  Resize any layers as needed and move into place to your liking.
12.  Apply mask of choice to the bottom layer.
13.  Add name and copyright.


Tuesday, February 13, 2024

Kenny K Singer


Supplies

Tube of choice. I'm using one by Kenny K. This tube was purchased at CDO. To my knowledge, Kenny K is not selling tubes at this time.

Mask of Choice.  I'm using Mask 77 by Karma, which can be found here

Font of Choice.  I used Fabulous 50's here.

Filters

Mura's Meister Copies

VM Extravaganza Heightline


1. Open a new canvas 800 x 800.  Yes, it's big, but some people like big tags, and we can resize at the end.
2. Copy and paste your tube as a new layer.
3.  Duplicate your tube and hide for now.
4. Working on your original layer, apply Mura's Meister>Copies Wallpaper(rotate) with default settings.  If your whole canvas isn't completely covered, apply Copies again until it is.
5.  Adjust>Blur>Radial Blur with the following settings.


6  Duplicate this layer.
7. On the duplicate layer, apply VM Extravaganza Heightline with the following settings.  (This may need to be imported into Filter's Unlimited.)


8. Apply a blend mode to the layer.  I used Overlay, but different colors can change the look.  Apply the blend mode that looks best with your tube and background.
9. Merge down.
10. Layers>New Mask Layer>From Image.  I used Random Mask 77 by Karma
11. Merge Group
12. Unhide your copy of the tube layer and duplicate again.
13. Move the bottom copy to where it looks best to you on the mask layer.  I moved mine all the way to the right, duplicated and mirrored it.  
14. On your mask layer, select all>Float>Defloat>Invert
15. Back on your bottom tube layer(s).  Hit delete.
16. On your main tube layer, resize as needed, and apply a blurry drop shadow.  I used Eye Candy 5 Perspective Shadow
17. Crop your excess canvas and resize to your liking.
18.  Add your copyright and name.  I added a drop shadow to my name, but feel free to add any effects you like to it.
19. Save as a PNG.


Hi All - New Word Art

 Hi everyone!  I have been neglecting this little blog for so very long now, but I think I might be back.  I might even have a tut or two coming up in the next few days or so.  I also want to update links and just generally clean it up around here.  In the meantime, I have a little word art that I made for you all.  You can just right click and save.


Wednesday, October 4, 2017

Beauty Blended - Old School Blend Tutoial


Supplies

Large tube of choice or close up
  • I'm using a tube by Jennifer Janesko.  She has a ton of face tubes that are perfect for this type of tag.  You can purchase her tubes at CDO here.
4 textures of choice  (12, 17, 20, 60 by Artpluslove here)
Moonbeams and Spiderwebs Timeline Masks 28 & 29 here
AAA Frames - Foto Frame
2 fonts of choice (one fat - one plain or script) - I used Back to Black Demo and Ellie Mae Demo


Please note.  If you are using different textures or tubes, you may have to change the blend modes to suit your tube/textures.  
 
1.  Open a new canvas  600 x 250.
2.  Copy/Paste texture 60 as a new layer, and arrange it where you like.  I just left mine where it was.
3.  Add a new raster layer.  Selections>Select All.
4.  Copy/Paste texture 20 into selection.  Deselect.
5.  Layers>New Mask Layer>From Image.  MB and SW Timeline Mask 29.  Source Luminance and Invert checked


6.  Layers>Merge Group
7.  Copy/Paste Texture 12 as a new layer.
8.  I wanted the color red to pop, so I colorized it.  Adjust>Hue and Saturation?Colorize  Hue: 0  Saturation: 141
9.  Layers>New Mask Layer>From Image.  MB and SW Timeline Mask 28.  Source Luminance and Invert checked
10.  Layers>Merge Group
11.  Add tube/close up and a new layer.  Resize as necessary and position on the left side of your tag.
12.  Double click on they layer in your layer palette and change the blend mode to overlay.
13.  Duplicate your tube layer.
14.  On the duplicate.  Adjust>Blur>Gaussian Blur - 3
15.  Change the blend mode on this layer to Soft Light.
16.  Copy/Paste Texture 17 as a new layer.
17.  Effects>Texture Effects>Weave with the following settings.


18.  Change the blend mode to Overlay and the Opacity to 67.
19.  Crop your image to 600 x 250.  This step is important as the frame will not work properly if you skip it.
20.  You can merge visible on your layers and apply the filter once, or if you're crazy like me, you can leave everything in layers and apply the filter to every layer.  I prefer to leave mine in layers, so I can manipulate things or change them if necessary.
21.  Apply AAA Frames Foto Frame with the following settings.  Remember if you left yours in layers like I did, you will need to apply this to each layer in your palette.


22.  Change your text color to Background>White Foreground>Color of choice (I used a dark red) and stroke to 1.
23.  Type out your word and apply a drop shadow of V&H - 2 O - 50 B-5
24.  Change the blend mode to Overlay.
25.  Duplicate and change the blend mode to Multiply and the Opacity to 58.
26.  Add your copyrights.
27.  Add your names using your thin font with the foreground set to null and the background white.
28.  Apply the same drop shadow you used for your "fat" word.  Duplicate the drop shadow twice.
29.  Save your tag as JPEG or PNG, and you are done.


Here are a couple more examples.


Sunday, August 20, 2017

Surf 'N Turf CT Snags

Hi everyone!  I have some new CT snags for you all today featuring the beautiful kit Surf 'N Turf by Freek's Creations.  This totally adorable and versatile kit has 62 elements, 2 frames, 2 word arts, and 11 papers.  It's absolutely perfect for those on the beach or in the ocean tags.  You can purchase this kit from Mystical Scraps here or Scraps & Company here.


My first set of snags is featuring the awesome art work of Alicia Mujica.  I swear, I don't use her art often enough.  You can purchase her artwork at her own site here.


My second set of snags is using the adorable artwork of Laguna.  You can purchase her tubes at Pics for Design here.  Do you imagine that kitty it bringing the fish back to the sea, or is he hoping for a snack?


Finally, would whoever has been trying to steal my mojo please stop?  My arms are tired from playing tug of war.  It's my mojo, and I need it.  Thank you for understanding.